
Mumeemagic is reader-supported. When you buy through links on our site, we may earn an affiliate commission.
For new parents, bottle-feeding their infant is one of the many basic activities they must perform since there are so many aspects that must all come together perfectly in order to ensure smooth feeding. The nipple on your baby’s bottle may have collapsed, and you might be wondering what caused it to happen and how it should be avoided from happening again.
In this post, we will discuss the causes of bottle nipple collapsing as well as several methods of preventing it from occurring in the future. Read on to find out more.

Picture Credits: Make your baby have the perfect feeding session.
Introduction to the Baby bottle design
The baby bottle is constructed in such a way that when the milk is consumed by the baby through the nipple, the air is allowed to flow into the bottle through a venting mechanism that is incorporated into the bottle. This prevents the milk from getting contaminated. A small hole present at the base of the nipple acts as a guide for the milk to go through it. It doesn’t matter how different the designs are across different brands and types, having that little hole is an essential necessary component in every single bottle.
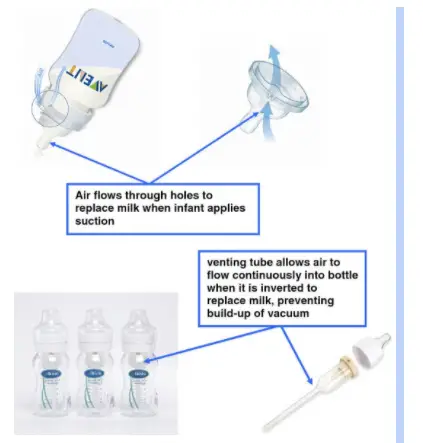
Picture Credits: Venting Mechanism of a baby bottle.
Why does a baby bottle nipple collapse?
Almost any parent who has bottle-fed their kid has likely experienced the frustration of having their child’s bottle nipple collapse; in fact, it is a regular issue with many popular bottle brands.
Your baby’s bottle nipple may collapse during feeding for a variety of reasons, including:
- Your baby’s bottle nipple is unable to keep up with the amount of liquid the baby is consuming: It indicates that he is sucking harder than the amount of air available to compensate.
- There is an obstacle preventing the airflow valve from the opening: Be careful to check the valve before each usage, and if you notice that this is still occurring, make sure that neither you nor your baby is holding their hand over the valve. Make sure to read proper instructions given on the package for locating the valve.
- The baby bottle is not assembled in a proper way: Read the instructions given on the packaging carefully in order to assemble the bottle. As soon as you’ve determined that the assembly is proper, pull on the nipple until the valve is opened.
Picture Credits: Choose the perfect nipple size for your baby.
When should I know that it’s time to change the nipple size?
Making a conscious decision about when to change the nipple size is crucial throughout the early stages of parenthood. In the early stages of bottle-feeding your infant, the sign that it’s time to raise the size of the bottle is often given by your child.
It is possible that the collapsing problem will linger even after many attempts to reassemble the bottle. As a result, it could be essential to replace the nipple with a larger one. The presence of a bigger nipple or a faster flow rate indicates that your infant is ready to transfer to a faster flow rate.
You may also notice that your child is taking longer to eat, which is due to the fact that the child is attempting to consume a greater volume of food while being constrained by the size of the nipple and movement of the air.
If you want to avoid nipple confusion, you should generally maintain the bottle’s flow as slow as possible.
Common nipple sizes
While your baby’s precise nipple size requirements may vary, the following are some general size guidelines for newborns:
- Preemie / Level 0 – 0+ months
- Level 1 – 0+ months
- Level 2 – 3+ months
- Level 3 – 6+ months
- Level 4 – 9+ months
- Y-Cut – 9+ months
How do you fix a collapsed nipple?

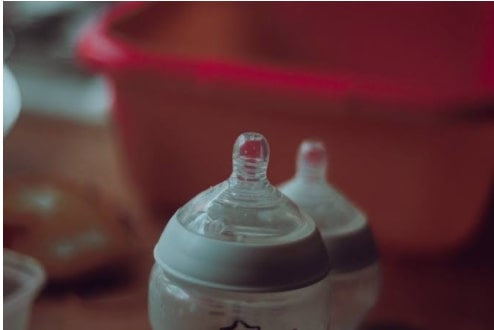
Picture Credits: Be careful of nipple collapsing while bottle feeding your baby.
As previously noted, a variety of circumstances may lead to the collapse of your bottle nipple, the most common of which is a clogged venting system, the nipple being too small for your baby’s needs, or the components being inadequately attached.
In order to fix a collapsed nipple, the first step is to open the bottle nipple, and you can do so by firmly pulling it with your fingers, drawing it in one direction, and then pulling it out until the slit in the valve is opened. However, if the collapse was caused by a collapsable nipple design, this may or might not be sufficient to remedy the underlying issue.
Consider opening the bottle before each use (after the milk or formula has been mixed and is ready to be fed) and manually pushing on the valve to open the slit to see whether the procedure is successful.
What if I can’t locate the valve?
Most likely, your bottle has been constructed improperly in this situation – make sure that all of your pieces are from the same manufacturer to guarantee that the valve is not blocked by another element of the bottle.
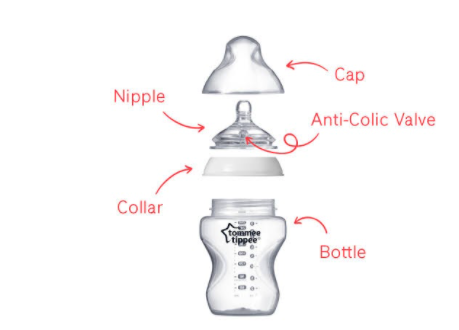
Picture credits: Labeled image to locate the valve.
Types of bottle nipples and ways to prevent each from collapsing
Parents who are also breastfeeding their infants choose Tommee Tippee bottles because the nipple is designed to resemble the feel of a mother’s breast, hence decreasing the likelihood that your kid may reject you in favor of the bottle. Unfortunately, the anti-colic design is particularly prone to sticking, and this may prevent regular ventilation of air from taking place in certain instances.
Tommee Tippee nipples, in particular, may be prone to collapsing if the vent in the seal has been completely plugged. It’s a wonderful habit to make your kid consume through a baby bottle by locating the seal at the base of the nipple and gently squeezing it between your fingers to reopen it each time before handing him his bottle.
To find the valve on the Avent Nipples, you need to identify the letter “N” that is displayed on it. Once you have identified it, you can easily locate the valve just below it.
Once you’ve located the valve, hold it firmly from below and pull it upwards until you see the slit in the valve opening. If this step is done, you are set to go and may begin feeding the baby.
Note: You should also clean and sanitize the components of your baby’s bottles regularly due to the danger of material being lodged inside the valve and preventing airflow from passing through.
Nuk nipples have a vent mechanism that is similar to that of both Tommee Tippee and Avent nipples. The vent is positioned at the base of the nipple, near the ring cap on both of these brands.
If your Nuk nipple is collapsing, make sure that all of the bottle’s components are clean and clear of debris before continuing.
If everything seems fine, double-check that all the components are from the same Nuk brand, since combining parts from various bottle types might cause venting difficulties, leaking, and other problems.
If this does not resolve the problem, the last step would be to grasp the nipple with both hands, position your fingers near the valve, and pull with both hands until you see the valve open up completely.
When compared to the majority of other brands in the market, Dr. Brown’s nipples have a special venting mechanism.
As opposed to other brands that use a little valve at the base of the nipple, this brand uses a unique design consisting of a broad neck straw and a silicone cover that is placed just inside the ring cap on the top. As a result of this venting mechanism, the air is prevented from mixing with the liquid contained inside the bottle, enabling the air pressure to maintain without introducing undesired air into your baby’s stomach.
Make sure that there are no obstructions inside the nipple, vent cap, or straw by inspecting the bottle’s components and venting system. Even the slightest quantity of formula or milk that has stacked up might obstruct appropriate ventilation.
Assuming that this is not the problem, check to see that the venting system has been appropriately installed. To determine whether the cap of the baby bottle is too tight, loosen it a little bit at the top to allow the pressure within the bottle to be released.
FAQs
What is a Y-cut teat?
Y-cut nipples are designed to have a Y shape in them, allowing for bigger amounts of milk to pass through more easily as opposed to the regular nipples, which just have more holes and allow for things such as milk to have a faster flow rate.
How do you know if the nipple flow is too fast?
It’s likely that you’ll notice milk spilling out of your baby’s mouth when the flow is too rapid during nutritional feedings. Furthermore, they may swallow, gulp, cough, or move away from the bottle in such circumstances.
Can slow nipple flow cause gas?
Slow-flowing nipples may sometimes lead hungry babies to take in excessive amounts of air during feeding, resulting in gas formation.
When should I change my baby’s nipple?
A good quality nipple can easily last anywhere between two and three months. That said, make sure that there aren’t any cracks on the bottle. If you find any, then you will have to change the bottle right away.
How do I know if my baby needs a faster flow teat?
Look for the following signs to identify when you need a replacement :
If the amount of feed baby is ingesting reduces gradually
Disturbances in sleep during the night
Wailing noises during feeding
Wanting more bottles during the day
Conclusion
We hope this article helped you gain some knowledge about the reasons behind the collapse of your baby’s bottle nipple. Always make sure to choose only the right size and a known brand while purchasing a baby bottle or bottle nipple for your baby.
Related Articles:
Boon Bottle Review
Haakaa Nipple Shield Review
Best Dish Soap For Baby Bottles
Best Baby Bottles For Acid Reflux